

Firebase Analytics for a Flutter app
Flutter Page 7

On Page 6, I thought I managed to make the app connect to my account on the Firebase cloud server. However, I was not sure what was happening. I decided to be a bit more rigorous about it and decided to follow the Google flutter documents to the letter. Below, I will relate my experience in following the instructions on Add Firebase to Flutter app page for an Android device emulator.
General
My editor/IDE : VS Code
Emulator :
Pixel 5 API 32 (android-arm64 emulator)I signed in to Firebase and created the project pascall-2022, I will specify this project name when I run
flutterfire configureon VS Code.I show below how I create the
firebase_analytics_exampleapp by copying the code from github.
I had already installed Firebase CLI but I copy how I did below.
Firebase CLI
I had already installed the Firebase CLI as I explained on Flutter Page 5. I copy below what I did:
I used
curl:$ curl -sL https://firebase.tools | bash
A YouTube video shows how it can also be installed by using
npmby:$ sudo npm install -g firebase-tools
Either way, it is located where
npminstalls all files that can be used globally (`-g` in the command line stands for global). On my Mac, this is/usr/local/bin. The Firebase CLI is a single Unix executable file in this folder with no dependencies. Add/usr/local/bin to$PATH.After I downloaded Firebase CLI, I had installed FlutterFire CLI by running the following command (which can be run in any folder in a VS Code terminal):
$ dart pub global activate flutterfire_cli
Any new app can be connected to Firebase by running the following command from the Flutter project directory:
$ flutterfire configure
Once we enter this flutterfire configure, we are asked a number of questions:
We can select either to use an existing Firebase project or to create a new Firebase project
We select the platforms (iOS, Android, Web) supported in your Flutter app. For each selected platform, the FlutterFire CLI creates a new Firebase app in our Firebase project.
A Firebase configuration file (
firebase_options.dart) is created automatically and added to the lib/ directory.(for Crashlytics or Performance Monitoring on Android) Add the required product-specific Gradle plugins to our Flutter app (assuming the
gradleplugin is already imported in our flutter app, which is done by default).
After this initial running of flutterfire configure, we need to re-run the command any time that we:
Start supporting a new platform
Start using a new Firebase service
In any case, rerunning the command does no harm and ensures that the Flutter app's Firebase configuration is up-to-date.
Initialise Firebase
From the Flutter project directory, run the following commands:
$ flutter pub add firebase_core$ flutterfire configure
In
lib/main.dart, import the Firebase core plugin and the configuration file:import 'package:firebase_core/firebase_core.dart';import 'firebase_options.dart';
Also in
lib/main.dart, initialize Firebase using the DefaultFirebaseOptions object exported by the configuration file:
  await Firebase.initializeApp(
  options: DefaultFirebaseOptions.currentPlatform,
);
It is essential that we do this initialisation asynchronously (i.e. using await). I tried otherwise and Firebase failed to initialise.
Analytics Example
Let us now try the above steps on an example app:
$ flutter create firebase_analytics_example
Now copy the example files into the local project folder:
Open the local
lib/main.dartDelete all its contents
Open the example main.dart
Copy and paste its contents into our local
lib/main.dartCreate a local
lib\tabs_page.dartfileOpen the example tabs_dart
Copy and paste its contents into the new local
lib/tabs_page.dart.
Add the firebase core and the analytics plugin:
$ flutter pub add firebase_core
$ flutter pub add firebase_analytics
$ flutterfire configure
I selected android and ios only. Firebase configuration file lib/firebase_options.dart was generated successfully with the following Firebase apps:
Platform  Firebase App Id
android   1:856675174707:android:1b31263232760ac1d7d646
ios       1:856675174707:ios:e72fdb4a7b308e0cd7d646
Replace firebase_config import with firebase_options import. I think in Flutter 2, the configuration data file was named firebase_config. Now it is called firebase_options.
We also need to replace DefaultFirebaseConfig.platformOptions in the example main.dart with DefaultFirebaseOptions.currentPlatform. This call is on Line 17 of local lib/main.dart.
Run the app After the above steps, I tried to Run without debugging on `Pixel 5 API 32 (android-arm64 emulator). It failed. The message was:
Error:
	uses-sdk:minSdkVersion 16 cannot be smaller than version 19 declared in library [:firebase_analytics]
Further explanation was given at the end as
┌─ Flutter Fix ─────────────────────────────────────────────────────────────────────────────────┐
│ The plugin firebase_analytics requires a higher Android SDK version.                          │
│ Fix this issue by adding the following to the file                                            │
│ /Users/Halim/flutter/work/firebase_analytics_example/android/app/build.gradle:                │
│ android {                                                                                     │
│   defaultConfig {                                                                             │
│     minSdkVersion 19                                                                          │
│   }                                                                                           │
│ }                                                                                             │
│                                                                                               │
│ Note that your app won't be available to users running Android SDKs below 19.                 │
│ Alternatively, try to find a version of this plugin that supports these lower versions of the │
│ Android SDK.                                                                                  │
│ For more information, see:                                                                    │
│ https://docs.flutter.dev/deployment/android#reviewing-the-build-configuration                 │
I did this but set minSdkVersion to 21 not 19 because I read that it would not run with 19 but needed to be 21. I did not try 19.
I changed in the file firebase_analytics_example/android/app/build.gradle :
minSdkVersion flutter.minSdkVersion→minSdkVersion 21
The new defaultConfig is:
   defaultConfig {
        // TODO: Specify your own unique Application ID (https://developer.android.com/studio/build/application-id.html).
        applicationId "com.example.firebase_analytics_example"
        // You can update the following values to match your application needs.
        // minSdkVersion flutter.minSdkVersion
        minSdkVersion 21
        targetSdkVersion flutter.targetSdkVersion
        versionCode flutterVersionCode.toInteger()
        versionName flutterVersionName
    }
Interrogate Firebase
The Firebase project can be interrogated from a bash terminal in VS Code on any folder.
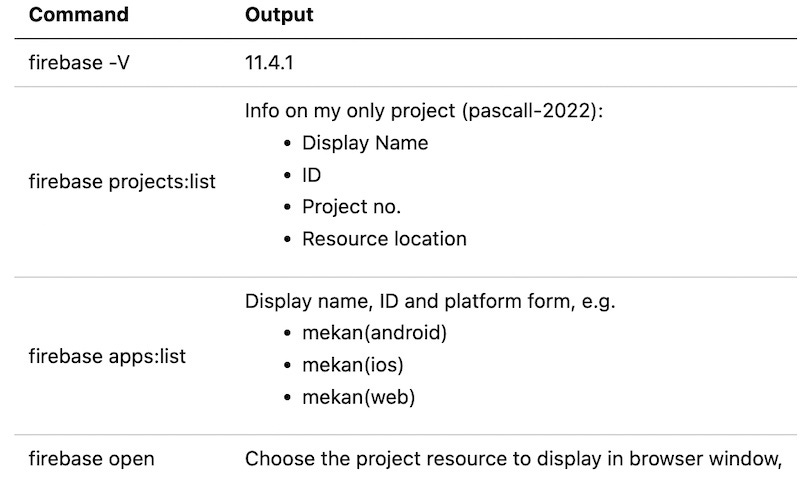
A full list of available firebase commands can be found on the firebase github project page.
A full list of available Firebase plugins is given on the firebase document page.
Run the app
This is how the app starts on the emulator:
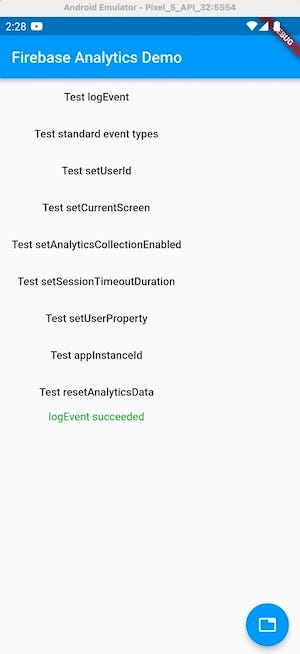
I click on the first option (Test logEvent) and also start the Firebase project dashboard in another window:
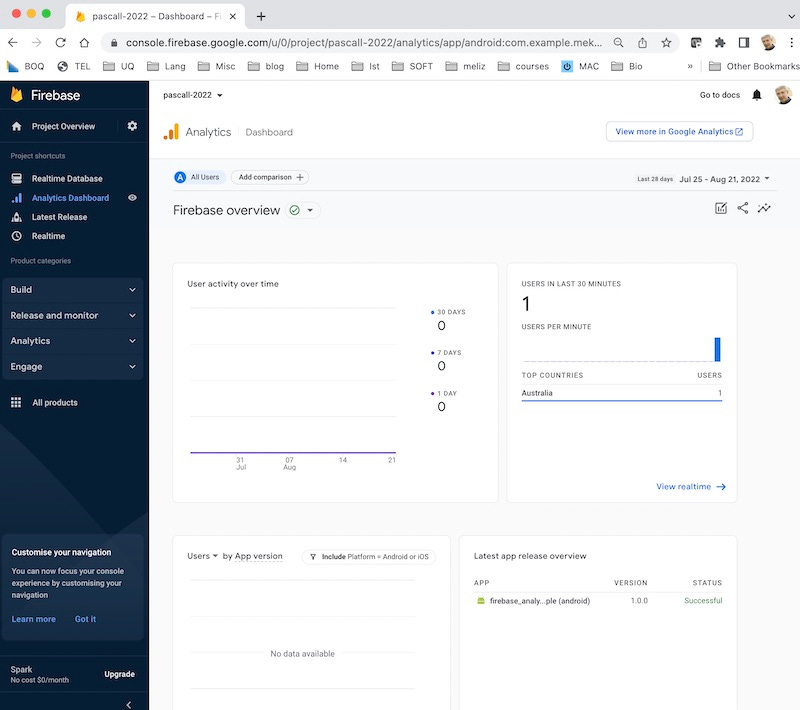
The Firebase document site says that I should now see one user logging in on Firebase console for my project, which I named pascall-2022. When I ran the app the first time, I thought I saw one user in last 30 minutes but this user disappeared and I kept getting zero users no matter how many times I restarted.
The next day, I restarted VS Code and reran the app again. This time I saw one user. I recorded the screen lest it might get lost again:
DebugView When worrying about if the app were talking to the Firebase or not, I found out that one could view the interactions using the so-called "Debug View" in Firebase Analytics site:
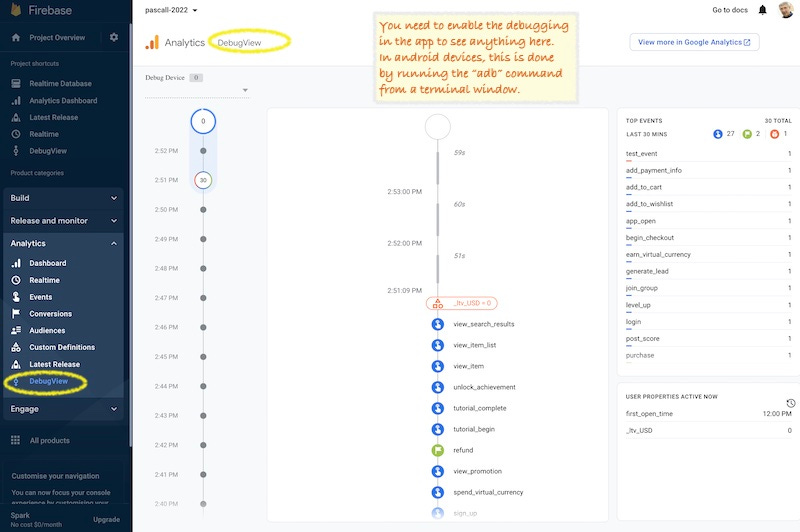
With an Android emulator, adb command is used to enable using the DebugView. The syntax for invoking adb is specified on the Firebase docs as
adb shell setprop debug.firebase.analytics.app PACKAGE_NAMEThe document did not say what the PACKAGE_NAME referred to. I had to ask on stackoverflow to find the answer. It turns out that the package name can be found in android/app/src/main/AndroidManifest.xml:
<manifest xmlns:android="http://schemas.android.com/apk/res/android"
    package="your.package.name">
In this instance, I enabled the debug by entering the following command from the VS Code bash terminal window while the app was running on the emulator:
adb shell setprop debug.firebase.analytics.app "com.example.firebase_analytics_example"This is probably long enough as a Substack page. The specific things this app (firebase_analytics_example) does, I may examine on a future page.