

Embeddings
Retrieval Augmented Generation (RAG) starts and ends with embeddings.

In November 2023, I started this new section, AI STUFF. The AI STUFF posts will alternate with my regular posts. The AI STUFF posts will be in English and Turkish. They are written in English and translated to Turkish. Both will be on the same page.
Kasım 2023 den itibaren yeni bir bölüme başlıyorum: AI STUFF. AI STUFF gönderileri normal gönderilerimle dönüşümlü olarak yayınlanacak ve ayni sayfada İngilizce ve Türkçe olacak.
This week I created a Jupyter Notebook on embeddings. This post is only a summary of the text created by that notebook. If you are interested in learning more you should download the notebook from GitHub: https://github.com/Gurgenci/probot/blob/main/embeddings.ipynb
Bu hafta Embeddings üzerine bir Jupyter Not Defteri oluşturdum. Bu yazı sadece bir özet. Daha fazlasını öğrenmek istiyorsanız not defterini GitHub’dan indirmelisiniz .GitHub: https://github.com/Gurgenci/probot/blob/main/embeddings.ipynb
What is an embedding?
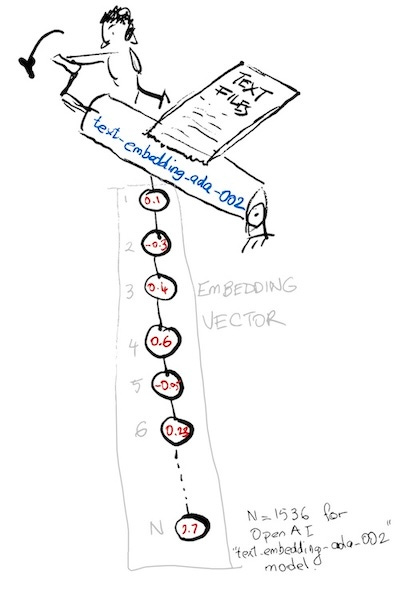
An embedding is a vector of numbers that represents a text. For example, using the method explained further below, I generated the following embedding vector for the text string Hello World!
Embedding, bir metni temsil eden sayıların vektörüdür. Mesela, Hello World! metin dizesi için oluşturduğum vektör yukarıda.
The following image shows how I generate the embedding vector by running my python function get_embedding() which you can find in CS3 at the beginning of the notebook (if you decide to download it). The roller in the image is that function. I feed the text string to the OpenAI API and it returns the embedding vector, which is falling down off the roller like a spaghetti string.
Yukarıdaki resim, bu not defterinin başında CS3'te bulabileceğiniz python fonksiyonu get_embedding() çalıştırarak embedding vektörünü nasıl oluşturduğumu gösteriyor. Resimdeki silindir sözde işte bu fonksiyondur. Metin dizesini OpenAI API'sine yüklüyorum ve spagetti çubuğu gibi makinadan embedding çıkıyor.
Calling OpenAI to generate the embedding vector
I use the get_embedding() function to generate the embedding vector. The following lines in that function gets the OpenAI API compute the embedding and the function returns it as a numpy array (np stands for numpy):
response = client.embeddings.create(
        input=text,
        model="text-embedding-ada-002"
    )
    return np.array(response.data[0].embedding)
Embedding vektörünü oluşturmak için get_embedding() fonksiyonunu kullanıyorum. Bu fonksiyonun tamamını notebook’da bulabilirsiniz. Yukarıdaki satırlar, OpenAI API'la haberleşmeyi gösteriyor. Fonksiyon sonucu bir numpy dizisi olarak döndürüyor (np, numpy anlamına gelir. onun kısaltılmışı.
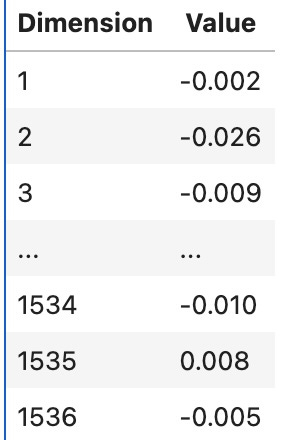
The length of the embedding vector
The length of an embedding vector is fixed for a given model. For example, the model text-embedding-ada-002 generates an embedding vector of length 1536. Whether the input text is only of two words (e.g. 'Hello World!' or whether it is the entire text of one blog post (e.g. https://halimgur.substack.com/p/why-did-elon-musk-buy-twitter), its embedding vector will be 1536 long when using text-embedding-ada-002
Belirli bir model kullandığınızda embedding vektörünün uzunluğu sabittir. Örneğin, text-embedding-ada-002 modeli 1536 uzunluğunda bir vektör oluşturur. Metin yalnızca iki kelime de olsa (örn. 'Merhaba Dünya!') veya bir blog gönderisinin tüm metni de olsa (örn. https://halimgur.substack.com/p/why-did-elon-musk-buy-twitter), text-embedding-ada-002 kullanıldığında embedding vektörü hep 1536 uzunluğunda olacaktır.
Visualisation of the embedding vector
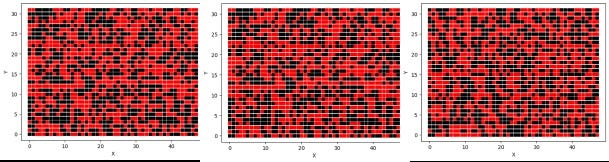
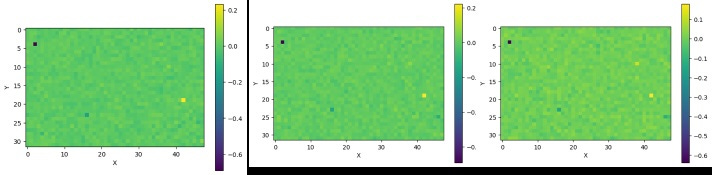
Visualizing the embedding vector for large language models (LLMs) like 'text-embedding-ada-002' presents a challenge due to the high dimensionality of the vector space (typically 1536 dimensions for text-embedding-ada-002). People have used dimensionality reduction techniques like PCA and t-SNE to reduce the dimensionality. I am not going to use those techniques in this notebook. I am interested in simple things like how the number of negative and positive entries and magnitudes change. This is not useful knowledge but I was curious. I reshaped the embedding vector to a 32 by 48 matrix and plotted it by coloring the negatives red and positives black. The following are the visualisation of the first three embeddings I used in the notebook:
'text-embedding-ada-002' gibi büyük dil modelleri (LLM'ler) için embedding vektörünün görselleştirilmesi, vektör uzayının yüksek boyutluluğu nedeniyle (mesela text-embedding-ada-002 için 1536 uzunluğunda) bir zorluk teşkil eder. Başkaları boyutluluğu azaltmak için PCA ve t-SNE gibi boyutsallık azaltma tekniklerini kullandılar. Bu defterde bu teknikleri kullanmayacağım. Negatif ve pozitif girdilerin sayısının, büyüklüklerinin nasıl değiştiği gibi basit şeylerle ilgileniyorum. Bu yararlı bir bilgi değil ama merak ettim. Embedding vektörünü 32'ye 48'lik bir matris olarak yeniden şekillendirdim ve negatifleri kırmızıya ve pozitifleri siyaha boyayarak çizdim. Yukarıda not defterinde kullandılan ilk üç embedding vektörünün görselleştirilmesi yer almaktadır.
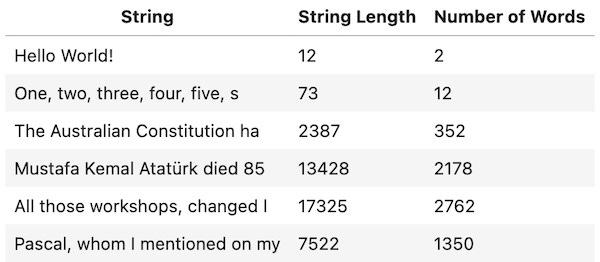
The first two are for short strings and the last one is for the preamble of the Australian Constitution. The number of positive and negative entries in each are in the table below
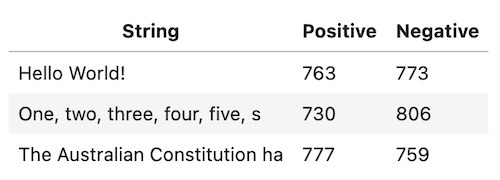
İlk ikisi kısa dizeler içindi ve üçüncü Avustralya Anayasasının giriş kısmı içindi. Her birindeki negatif ve pozitif rakamların sayısı yukarıdaki tabloda verilmiştir.
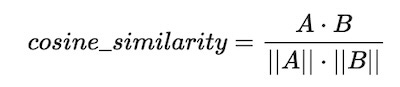
As you can see, there is not a significant difference between the number of positive and negative entries. I then plotted the embeddings using the viridis colormap, which is a utility offered by the matplotlib library. CS2 section above in this notebook has the function. The following are the results:
Gördüğünüz gibi negatif ve pozitif sayıları arasında ciddi bir fark yok. Daha sonra matplotlib tarafından sunulan bir yardımcı program olan viridis renk haritasını kullanarak gösterdim. Not defterinin CS2 bölümünde nasıl yaptığımı görebilirsiniz. Sonuçlar yukarıdadır.
The color plots suggest that all three embeddings have their minimum member at the top left corner. The following table shows the index and the value of the minimum and maximum values for all six embeddings:
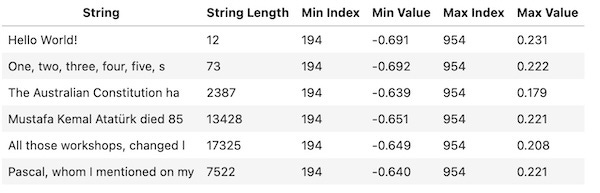
Renkli grafikler, her üç yerleştirmenin de minimum üyelerinin sol üst köşede olduğunu göstermektedir. Yukarıdaki tablo, altı embedding için minimum ve maksimum değerlerini gösteriyor.
How to measure distance between two embeddings?
The cosine similarity is a measure of similarity between two vectors. The cosine similarity of two vectors is the cosine of the angle between them. It is calculated as follows:
Those of you who know their linear algebra will know that the dot product of two vectors is the product of their magnitudes and the cosine of the angle between them. The cosine similarity is the dot product of the two vectors divided by the product of their magnitudes. The cosine similarity is a number between -1 and 1. If the cosine similarity is 1, then the two vectors are identical. If the cosine similarity is -1, then the two vectors are opposite to each other. If the cosine similarity is 0, then the two vectors are orthogonal to each other.
Kosinüs benzerliği, iki vektör arasındaki benzerliğin bir ölçüsüdür. İki vektörün kosinüs benzerliği aralarındaki açının kosinüsüdür. Üstteki denklemdeki gibi hesaplanır.
Lineer cebir bilenler, iki vektörün nokta çarpımının, büyüklüklerinin ve aralarındaki açının kosinüsünün çarpımı olduğunu bilecektir. Kosinüs benzerliği, iki vektörün nokta çarpımının büyüklüklerinin çarpımına bölünmesiyle elde edilir. Kosinüs benzerliği -1 ile 1 arasında bir sayıdır. Kosinüs benzerliği 1 ise iki vektör aynıdır. Kosinüs benzerliği -1 ise iki vektör birbirine zıttır. Kosinüs benzerliği 0 ise iki vektör birbirine diktir.
The following are the cosine similarities of the six embeddings with the embedding of the preamble of the Australian Constitution
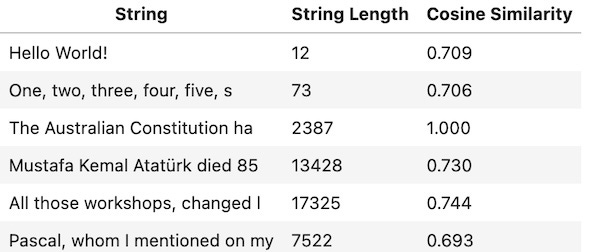
Yukarıdakiler, not defterinde tanımlayıp kullandığım altı embedding ile Avustralya Anayasası'nın giriş bölümünün arasındaki kosinüs benzerlikleridir.
As you can see it is favouring the fourth string, which is my blog post on Elon Musk. I started that post with a brief note on November 10th, which is the date Mustafa Kemal Ataturk died. But it is only a small part of the post. This is probably why the cosine similarity is not very high.
If you download the notebook, then you can run this cell with different queries to see how the cosine similarity changes.
Gördüğünüz gibi, Elon Musk hakkındaki blog yazım olan dördüncü diziyi tercih ediyor. O yazıya Mustafa Kemal Atatürk'ün öldüğü tarih olan 10 Kasım'da kısa bir notla başlamıştım. Ama bu başlangıç yazının sadece küçük bir kısmı idi. Muhtemelen kosinüs benzerliğinin çok yüksek olmamasının nedeni budur.
Not defterini indirirseniz kosinüs benzerliğinin nasıl değiştiğini görmek için farklı sorularla çalıştırabilirsiniz.
The optimal size for the text sections
According to Bard and ChatGPT, there is not an easy rule to determine the optimal size of the text sections. ChatGPT says that as a rough guideline, in many NLP applications, text sections ranging from a few sentences to a few paragraphs (roughly 100 to 500 words) are commonly used, but this can vary significantly based on the specific use case and requirements.
Let us calculate the number of words in the our text passages:
Bard ve ChatGPT'ye göre metin bölümlerinin optimal boyutunu belirlemek için belli bir kural yok. ChatGPT, kaba bir kılavuz olarak, birçok NLP uygulamasında, birkaç cümleden birkaç paragrafa (kabaca 100 ila 500 kelime) kadar değişen metin bölümlerinin yaygın olarak kullanıldığını, ancak bunun özel kullanım durumuna ve gereksinimlere göre önemli ölçüde değişebileceğini söylüyor.
Benim metinlerdeki kelime sayısı yukarıda.
It looks like some of my strings are too long. It is easy to split them to smaller segments but this may cause other problems. For example, if I do the segmentation automatically, part of an important sentence can be in one segment and the other part in another segment. This may cause the loss of the information included in that segment. It is possible to have them overlapping each other. The best option of course is to obey the optimum segment size condition while preparing the corpus. But this requires knowing what that optimal number is. This needs further thinking and probably some experimentation.
Bazı pasajlarım çok uzun. Bunları daha küçük parçalara ayırmak kolay ancak bu başka sorunlara neden olabilir. Mesela segmentasyonu otomatik yaparsam önemli bir cümlenin bir kısmı bir segmentte, diğer kısmı başka bir segmentte kalabilir. Bu, o segmentte yer alan bilgilerin kaybolmasına neden olabilir. Segmentleri birbiriyle örtüştürmek bir çözüm olabilir. Elbette ki en iyi seçenek korpusu hazırlarken optimum segment boyutu koşuluna uymaktır. Ancak bu, optimal sayının ne olduğunu bilmeyi gerektiriyor. Daha fazla düşünmeye ve muhtemelen biraz deneme yanılmaya ihtiyaç duyar.
I asked Bard for some references in this area. It gave me the following:
RAG: Retrieval-Augmented Generation for Knowledge-Intensive NLP Tasks by Lewis et al. (2020):This paper introduces the RAG model and discusses the potential benefits of using different text section sizes for retrieval and generation.While the paper doesn't provide specific optimal sizes, it emphasizes the importance of experimenting with different sizes based on the task and dataset.Link: https://arxiv.org/abs/2005.11401Exploring the Impact of Text Chunk Size in Dense Retrievers by Chen et al. (2022): This paper investigates the impact of text chunk size on the performance of dense retrieval models, which are often used as the retrieval component in RAG models.Their findings suggest that a moderate chunk size (e.g., 512 tokens) can achievea good balance between retrieval accuracy and computational efficiency.Link: https://arxiv.org/abs/2211.14876Adaptive Text Chunk Size for Efficient Dense Retrieval by Wang et al. (2022):This paper proposes an adaptive text chunking approach that dynamically adjusts the text chunk size based on the document length and complexity.Their results demonstrate that this approach can improve retrieval accuracy and efficiency compared to using a fixed chunk size.Link: https://arxiv.org/abs/2205.03284
Yukarıdakiler Bard’ın tavsiye ettiği bazı kaynaklar.
Please Join Me
If you have an area of expertise which you would like to share with the world using this new technology, please join me. I will be regularly (hopefully fortnightly) posting my progress on Substack. I will also be posting my code on Github. I will be using Python and the OpenAI API. In addition, I created an X (formerly known as Twitter) Community Group 'Building AI Tutors'. If you are interested, please join the group. I will be posting my progress there as well.
You do not need to be an experienced Python programmer but some knowledge of Python will be helpful. Below I list the steps you need to take to join me and explain how to go about it:
Install VS Code from https://code.visualstudio.com/download. This is a free code editor and development environment. It is the tool I am using therefore should be able to help you if you have problems.
Install Python from https://www.python.org/downloads/. At the time I started this notebook,
Download my
probotfiles from my account on github. I do not think you need to have a github account to do this. The name of the project is probot. You can download the wholeprobotfolder as a zip pack and unzip to your local disk.
Bu yeni teknolojiyi kullanarak dünyayla paylaşmak istediğiniz bir uzmanlık alanınız varsa lütfen bu öğrenme yolculuğunda bana katılın. Ben yaptıklarımı düzenli olarak (umarım iki haftada bir) Substack'ta özetleyeceğim. Detaylı anlatım ve programlarımı Github'da yayınlayacağım. Python ve OpenAI API'sini kullanacağım. Ek olarak, bir X (eski adıyla Twitter) Topluluk Grubu 'Yapı Yapay Zeka Eğitmenleri' oluşturdum. Eğer ilgileniyorsanız lütfen gruba katılın. Gelişmelerimi orada da paylaşacağım.
Deneyimli bir Python programcısı olmanıza gerek yok ancak biraz Python bilgisi faydalı olacaktır. Aşağıda bana katılmak için atmanız gereken adımları listeliyorum ve bunu nasıl yapacağınızı açıklıyorum:
VS Code'u https://code.visualstudio.com/download adresinden yükleyin. Bu ücretsiz bir program ve benim kullandığım araçtır, dolayısıyla sorun yaşamanız durumunda size yardımcı olabilirim.
Python'u https://www.python.org/downloads/ adresinden yükleyin.
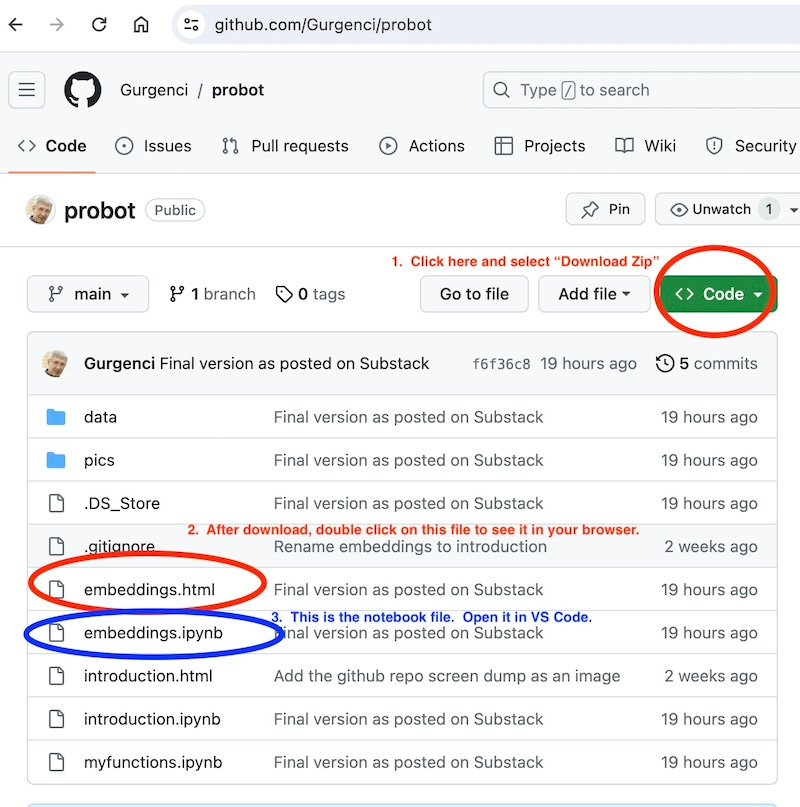
Tüm program ve detaylı anlatımları github'daki hesabımdan indirin. Bunu yapmak için bir github hesabınızın olması gerektiğini sanmıyorum. Projenin adı probot. Probot klasörünün tamamını zip paketi olarak indirebilir ve zip dosyasını yerel diskinize açabilirsiniz
Please download this zip pack and read 'introduction.html’ on your computer before you make your decision whether this is something you would like to pursue. If you do not want it, you will still continue the AI STUFF posts every two weeks if you are a subscriber to my blog because I cannot target different subscriber sections for different sections.
Lütfen bu zip paketini indirin ve bu yolculukta beni takip edip etmeme kararınızı vermeden önce bilgisayarınızda 'introduction.html'yi okuyun. Bloğuma abone iseniz iki haftada bir AI STUFF paylaşımlarına devam edeceksiniz çünkü farklı bölümler için farklı abone bölümlerini hedefleyemiyorum
Sevgili Halim,
Konuyu epey bir çalışmak gerekli gibi.
Programları indirip, deneme yapıp işi kavrayabilirsem ne mutlu bana.
Teknolojiden kopmamak için, bu yaştan sonra öğrenmemiz gereken çok konu var.
Hepimize kolay gelsin.